
Part 3: Building a Monaca App
This tutorial will cover building Monaca apps for iOS and Android:
For more information about building Monaca apps for other platforms, refer to Build.
Building a Monaca app for iOS
This section will explain, how to create a debug build version of your app for iOS and install it on a development device. For more information about the types of build, please refer to the types of build.
Prerequisites:
You must enroll in the Apple Developer Program.
You are required to create the following items in the iOS Provisioning Portal:
App ID(see Register an app ID and Register a development device)Developer Certificate(see Generate a certificate)Development Provisioning Profile(see Create a provisioning profile)
Step 1: Configuring the iOS app settings
From the Monaca Cloud IDE menu, go to Configure → App Settings for iOS.
Fill in the app information:
Field
Description
Application name
The name representing your app in the App Store
App ID
A unique ID representing your app. It is recommended to use reverse-domain style (for example,
mobi.monaca.appname). Only alphanumeric characters and periods (at least one period must be used) are allowed.Version Number
The number representing the version of your app. It will be required when uploading your application via App Store Connect later (publishing process). It needs 3 numbers separated by dots (for example, 1.10.2). Each number should be in
[0-99].
The remaining information is optional. You can configure for example the icon and splash screen of the app.

The app ID (set in the Monaca app settings) cannot contain asterisk (*) or the build will fail. The App ID must be the same as the explicit app ID you register (or have registered) in the Apple Developer Program.
3. After finishing the configurations, click Save.
Step 2: Configuring the iOS build settings
From Monaca Cloud IDE menu, go to Configure → iOS Build Settings.
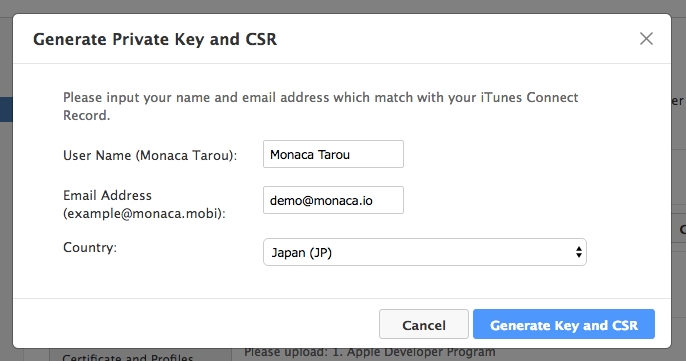
You can either create a new private key or import an existing one. This tutorial will show how to create a new private key. Therefore, click the Generate Key and CSR button.

3. Fill in your Apple ID information (user name and email address) and country. Then, click the Generate Key and CSR button.
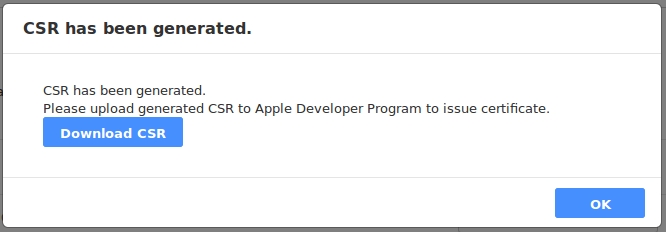
4. The following dialog box will open if your authentication is successful. Click the Download CSR button. The downloaded CSR file will be required later to issue the certificates in the iOS Provisioning Portal.
Step 3: Building the App
From the Monaca Cloud IDE menu, go to Build → Build App for iOS .
Select the Debug Build option and the corresponding provisioning profile. Then, click Start Build.

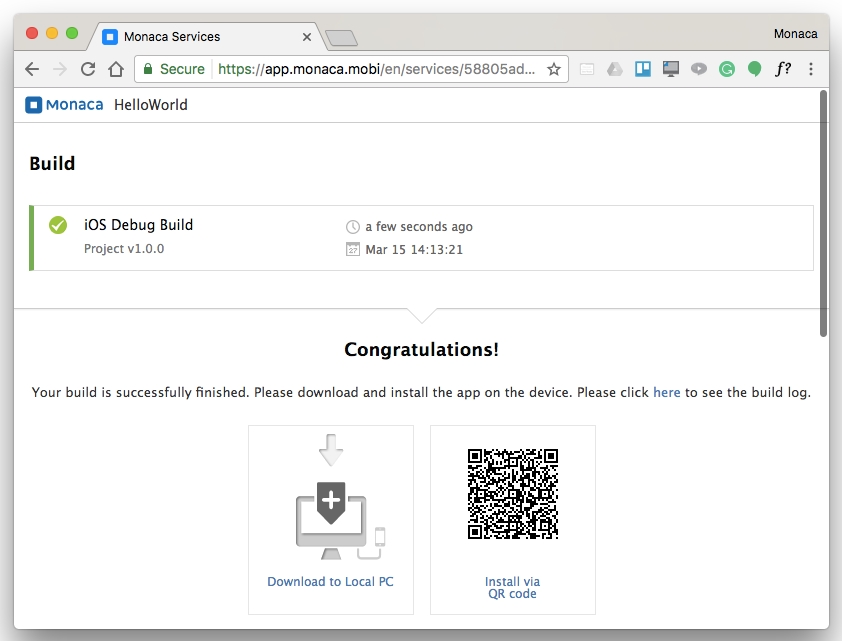
3. It may take several minutes for the build to complete. The following screen will open after the build is complete.
Step 4: Installing the built app
There are 3 ways to install a debug built app such as:
Download the built app and use the Apple Configurator 2 to install the built app on your iOS device. (Mac Only)
Install via QR code.
Install via configured deployment services.
Building a Monaca app for Android
This section will explain, how to create a debug build version of your app for Android. For more information about the types of build, please refer to Types of build.
Step 1: Configuring the Android app settings
From the Monaca Cloud IDE menu, go to Configure → App Settings for Android .
Fill in the app information:
Setting
Description
Application Name
The name representing your app in the Market
Package Name
A unique name that will be used when uploading to the Android Market. It is recommended to use the reverse-domain style (for example, io.monaca.app_name) for app ID. Only alphanumeric characters, periods (at least one period must be used) and underscore are allowed. Each segment should be separated by a period and started with an alphabetic character.
Use Different Package Name for Debug Build
If enabled, the package name of a release built and a debug built apps are different. The package name of a debug built app will have .debug extension, and the one for a project debugger will have .debugger extension. However, this option is disabled by default because it made some plugins impossible to be debugged due to the fact that they are tied to the exact package names (eg. in-app purchase).
Version
The version number of your app. A version number consist of numbers separated by dots (for example, 1.0.0).
Version Code
The internal version number of your app, relative to other versions. The value must be an integer, so that the applications can programmatically evaluate it for an upgrade.
Fullscreen
This option is only available with the Cordova 3.5 and later. If enabled, your app will run in a fullscreen mode which hide the status bar.
The remaining information is optional. You can configure for example the icon and splash screen of the app.

3. After finishing the configurations, click Save.
Step 2: Configuring the Android KeyStore
Android KeyStore is used for storing the keys (alias) needed to sign a package. When a KeyStore is lost or overwritten by another KeyStore, it is impossible to resign the signed package with the same key. One KeyStore can contain multiple alias, but only one alias is used for code-signing an application.
To configure an Android KeyStore in Monaca, follow the instructions below:
From the Monaca Cloud IDE menu, go to Configure → Android KeyStore Settings.
The KeyStore can either be created or imported. In this tutorial, we assume that you need to create a new KeyStore. Therefore, click the Clear and Generate New button.

3. The following screen will open:
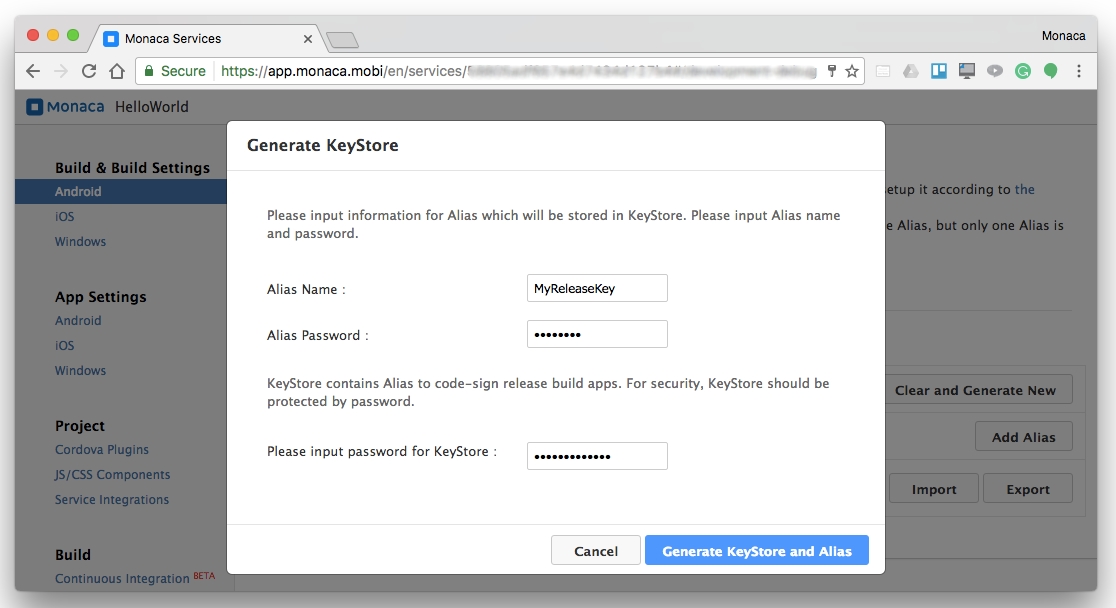
4. Fill in the necessary information as shown in the above screen:
Alias: the name representing the private key that you will use later when signing your app. Multiple aliases can be stored within one KeyStore.Alias Password: the password for the private key (alias).Password for KeyStore: the password for the KeyStore. You will need this password when importing the KeyStore.
5. Then, click the Generate KeyStore and Alias button to generate the KeyStore.
Step 3: Building the app
From the Monaca Cloud IDE menu, go to Build → Build App for Android.
Select the Debug Build option and click the Start Build button.

3. It may take several minutes for the build to complete. The following screen will open after the build is successfully completed.
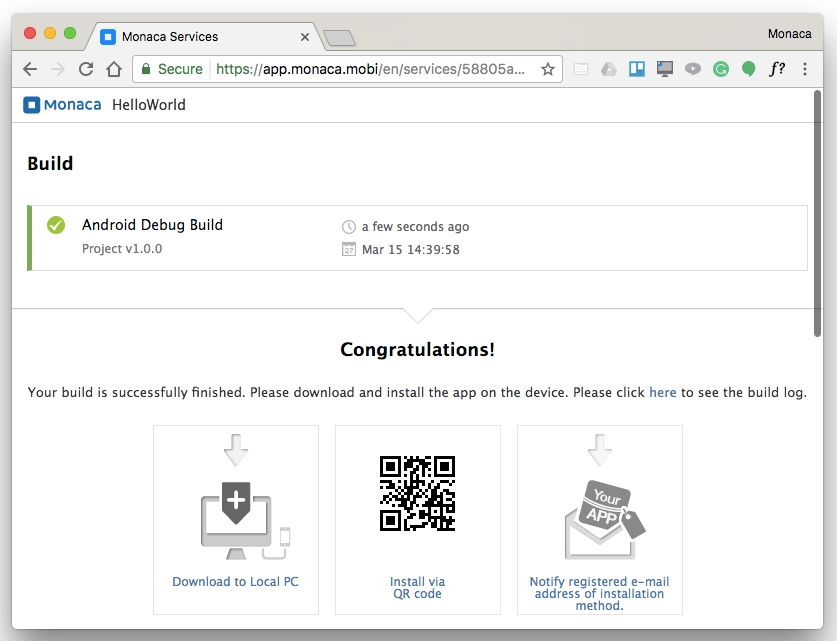
Step 4: Installing the built app
There are 5 ways to install the built app:
using the network install
installing via QR Barcode
downloading the built app directly to your computer and installing it via USB cable
sending a URL to download the built app to a registered email address
installing via configured deployment services.
Last updated
Was this helpful?