Overview
Monaca CI (Continuous Integration & Deployment) is a service that has been integrated within the current Monaca development environment stack to automate building and deployment cycles.
This automation process is done by using webhooks. Webhooks allow you to build or set up integrations that subscribe to certain events (for example, code commit and branch/tag creation) on GitHub and many other Git services. For Monaca CI, every time you push your project code to the GitHub, GitHub will send a HTTP POST payload to the Monaca server. If the received information meets the Monaca CI configuration, the automation will begin.
Therefore, Monaca CI lets developers focus more on the code and less on the backend process of building, testing and deploying an app.
Prerequisite
In order to use Monaca CI, you will need to integrate GitHub with your Monaca account. If you haven't done it, please follow the instructions below:
Link your Monaca account to GitHub. Please refer to GitHub Integration.
Connect your project to your GitHub repository. Please refer to Connecting a Monaca project to a new GitHub repository.
Getting started with Monaca CI
Assuming you have successfully linked a GitHub repository to your project, you are now ready to enable Monaca CI. Please do as follows:
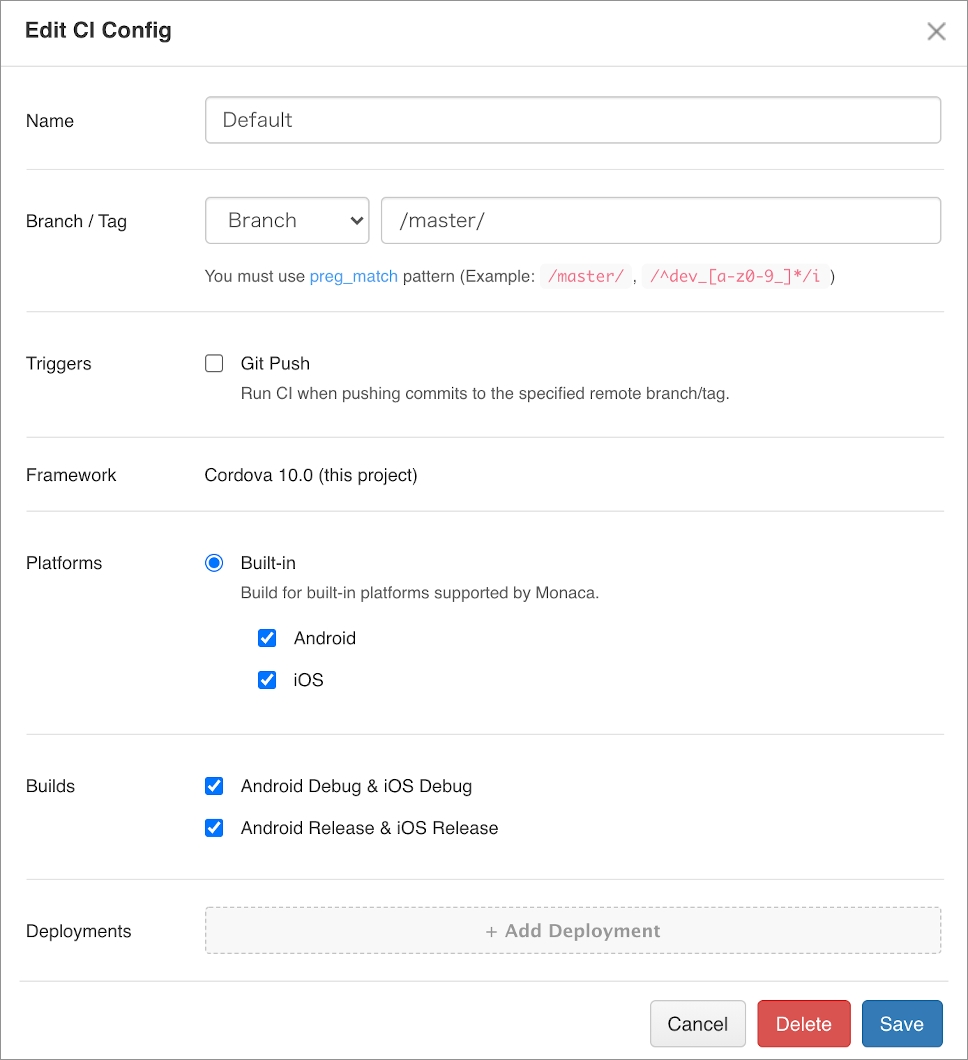
From the Monaca Cloud IDE menu, go to Configure → Continuous Integration.
Monaca CI is disabled by default. To enable it, check the Triggers and then save it. That’s it! Now your Monaca CI is ready. You can start pushing your project code to the valid branch or tag as configured. Then, you should be able to find the built files under the
Build Historypanel.

You have to start the build manually in the IDE (one time only) before the Monaca CI can start the automatic build later. This is because you will need to input a valid keystore (for Android) or upload the right provisioning profile (for iOS) for release build.
Automating deploy services
You can also automate your app distribution process with Monaca CI. In order to do this, please do as follows:
From the Monaca Cloud IDE menu, go to Configure → Deploy Services.
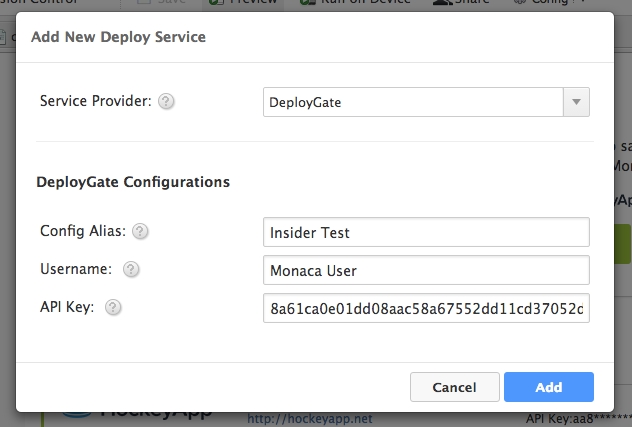
Click Add Deploy Service.
Choose a deployment service and fill in the required information:
Config Alias: a unique identifier for each serviceUsername (DeployGate only): app’s owner’s username or organization registered in DeployGateAPI Key(DeployGate) orAPI Token(HockeyApp/Appetize): API key provided by the deployment service provider. For more information on how to get the API key for each service, please refer to Deploy Services.

Monaca CI execution procedure
To use the Monaca CI to create a release build for iOS and Android when pushing the project code to a branch called master, read the following instructions. You can also use the Monaca CI to distribute the built files to two deployment services such as DeployGate and HockeyApp.
Push the code to GitHub.
If the code is pushed to a valid GitHub’s branch/tag, the Monaca server will start building your project. Please go to Build → CI History to see the live process of the Monaca CI. After the build is completed, you can find the built files in the
Build Historypanel (Build → Build History).


3. When the build process is successfully completed in the Monaca server, the build files will be sent to the configured deployment services.
Last updated
Was this helpful?